BHUTAN – Similar to the Eiffel Tower or the Statue of Liberty, Tiger’s Nest Monastery is one of the iconic landmarks of the country of Bhutan.
Perched at an elevation of 3,000 meters above the Paro Valley, the Paro Taktsang Monastery (Tiger’s Nest Monastery) was constructed in the late 17th century on the site of a cave nestled deep within the cliffs.
Though we refer to it as Tiger’s Nest in English, the more accurate translation of Taktsang is “Tiger’s Lair,” cleverly derived from the legend of its founding.
https://www.instagram.com/p/CNmWhKXjbCW/
According to this legend, the 8th-century Indian Buddhist master, Guru Rinpoche, was carried up the mountain on the back of a disciple who had transformed into a tigress.
Upon reaching the location, Guru Rinpoche then spent 3 years, 3 months, 3 days, and 3 hours meditating in the cave. After his completion, it became a sacred site known as Paro Taktsang.
Explore more: Bhutan Travel Experiences.
Location of the Tiger’s Nest Monastery in Bhutan
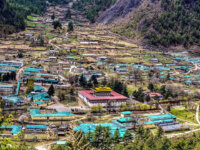
The monastery is situated approximately 15 kilometers from Paro Airport. It is in close proximity to many other enticing attractions in Bhutan, such as the Sangchen Chökhor Monastery, Drukgyel Dzong, Bumdrak Monastery, Kyichu Lhakhang, Jangtsa Dumtseg Lhakhang, and more.
Address: Taktsang Trail BT, Taktsang Trail, Paro, Bhutan.
Preparing for the Trek to Tiger’s Nest
To allow for ample time to complete the trek to Tiger’s Nest, it’s advisable to wake up early and depart from Thimphu at around 6 AM, aiming to arrive at the base of the mountain by 8 AM when it opens to the public.

Tourists Exploring Bhutan with Fit Tour
At the entrance, a collection of small stalls is set up for souvenir shopping and handicrafts. You can also find wooden walking sticks with carvings for sale at 50 Nu (approximately $0.70 USD). Such a walking stick can be quite handy for the trek.
Once you pass through the stalls, the walk begins gradually. Beyond the gate, you’ll traverse some fields to reach the base of the cliffs. Here, local residents rear mules and horses that you can hire to transport you up the trail.

The Fit Tour group taking photos on the way to Tiger’s Nest Monastery
Explore more: Beautiful Villages in Bhutan.
You can consider whether or not to rent these animals.
- First, you should be concerned about the welfare of the animals.
- Second, you might have to cover some sections of the path on foot, as the steep inclines can make it difficult for them to safely carry a person over certain stretches.
- Third, I don’t know if you’ve ever ridden a mule or another horse-like animal, but if you’re not accustomed to it, it can be uncomfortable.
Starting the Journey
The terrain begins to slope upward, and we’re officially on our way up!
Although we’re still far from Tiger’s Nest at this point, we enter an area covered in dense vegetation on one side of the cliff. As it turns out, the main part of the Tiger’s Nest hike isn’t particularly challenging. It mainly involves following a gradually ascending path along the side of the cliff.

The trekking route to Tiger’s Nest Monastery in Bhutan.
At the steeper starting points, the trail meanders through the trees to make the ascent more manageable. However, there are places where people have cut a more direct route to the next switchback.
These paths are easier to follow but significantly steeper. So, in technical terms, they can be quicker, but they may depend on your physical fitness level (and the risk of getting lost).
The journey is a test of endurance. You might not be accustomed to the altitude and find yourself breathing much harder than usual.
Halfway There…
After a few hours of hiking (with frequent breaks for those not acclimated to high altitudes), we’ll reach a mid-way stopping point on the Tiger’s Nest trek.
Here, you’ll find restroom facilities and an indoor guest area where you can grab some snacks and refreshments. It’s a great place to catch your breath.
https://www.instagram.com/p/CdhtcOppwHB/
We’ll pause for about 10-15 minutes and enjoy a cup of tea before continuing our ascent along the cliff. There are still a few hundred meters to go before we reach Tiger’s Nest, with some more uphill and downhill stretches.
We’ll spend a few more hours climbing the rocky terrain. During this time, Tiger’s Nest gets closer with each step. However, it’s now out of sight. Nevertheless, as we round a corner on an unusually flat section of the trail, we stumble upon an observation platform.

The Fit Tour group capturing moments on their way to Tiger’s Nest Monastery.
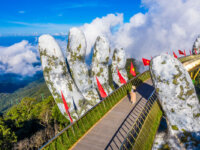
To our surprise, we’re actually a bit higher than Tiger’s Nest. From this vantage point, we can look down at it from a small valley. Further up the trail, a suspension bridge spans a gap beside a waterfall, surrounded by prayer flags.
Explore more: Bhutanese Cuisine.
The Tricky Part
This is the section of the journey we didn’t anticipate. To reach Tiger’s Nest Monastery from this trail, you have to hike further up the mountain. From there, you descend back down for several hundred steps, only to climb up again on the other side of the suspension bridge.
The descent isn’t too challenging, but with thinner air and rising temperatures, it’s the final tough push to the summit.
https://www.instagram.com/p/CdDIDDPJZF7/
Sure enough, you’ll be climbing up the last set of stairs near the waterfall. Fortunately, the area around the suspension bridge is particularly serene and refreshing. Prayer flags flutter in the breeze and mist rises from the waterfall into the air.
It’s an excellent energy boost and readies us for the final leg of the journey.
Learn more: Major Festivals in Bhutan.
The Final Stretch
The stairway leading to Tiger’s Nest feels like one of the longest you’ll ever encounter. The steps seem to get steeper as you go. However, once we reach the summit, it all becomes worth it.
Upon entering Tiger’s Nest Monastery, we surrender our cameras and phones at the entrance and leave our shoes (Photography is not allowed inside the monastery). We take one last look at the valley and step inside Tiger’s Nest, immediately feeling a sense of serenity.
The Bhutanese believe that by crossing the threshold of the monastery, you are blessed, so many people offer prayers with folded hands.
https://www.instagram.com/p/Cb0A_LarbZp/
To see the interior, you must join a tour (or have pre-arranged a tour with a guide from Vietnam). The tour is led by a monk living and working at Tiger’s Nest Monastery.
Overview
Total Distance: 3-4 miles round trip (depending on whether you cut through the mountain or go ‘around’ it)
Elevation: 1,700 feet (518 meters)
Highest Elevation: 10,232 feet (3,119 meters)
Time Required: Duration varies depending on physical fitness. Most people complete it in about 3 hours!
Difficulty: As mentioned, it’s a relatively easy hike, just a bit steep. However, you may want to consider issues related to physical activity or respiratory concerns.
Cost: If you have to pay the tourist fee to enter Bhutan, this fee already covers the Tiger’s Nest hike and can be arranged by your guide. Entry to Paro Taktsang is free for Bhutanese citizens (MUST be in national dress) or 500 Ngultrum ($7) for foreigners.
Opening Hours: 8:00 AM to 1:00 PM; 2:00 PM to 6:00 PM.
What to Bring: Hiking boots, comfortable long-sleeved hiking clothing (make sure your arms and legs are covered), PLENTY OF WATER, a long hiking stick. You should also bring motion sickness medication, as many people are affected by the altitude.
Best Time to Visit: We recommend visiting in the spring or autumn. Summer can be unbearably hot in Bhutan, even at higher elevations, while winter can be extremely cold (even with multiple layers) and may involve icy conditions.